The first step is to open two applications on your desktop: Powerpoint and your Internet browser. Select your Internet browser and type in the URL of the website you wish to capture. If you want, scroll up and down the webpage to properly "pose" the webpage to show only the portion you wish to capture. Now hit the "print screen" button on your keyboard. This copies a picture of whatever is on your screen to your computer clipboard.
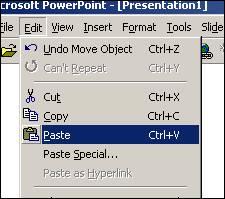
Toggle away from your browser and go to Powerpoint. Select Insert, New Slide. Now point to that new slide, and select Edit, Paste. Shazam! The webpage image should appear instantly on the slide. Depending on your Powerpoint file, you may need to fiddle with image positioning and size. To move and center the image, click on the screen capture and move the crosshairs until the image is in the desired position. You may also need to slightly shrink or enlarge the image to properly fit on the slide. Do this by clicking on the image and point to one of the image corners until the cursor turns into a diagonal line with two arrows. While holding down the shift key, click and drag the diagonal line until the image is the proper size and covers the entire slide.
That's all there is! With a simple press of the "print screen" button, you can transform a dull, text-only presentation into a colourful and more visually appealing webpage showcase.

2 comments:
Thanks for the tip!
I have wondered how to do this trick for a long time. Thanks so much for the help!
Post a Comment